Tuesday, August 30, 2011 0 comments

Italian Feast Pizza


Want some pizza that is full of flavor, not greasy, but fills you up? Try this filling Italian Feast Pizza recipe. This is one of my favorite pizzas, it's the ultimate pizza for a bunch of guys sitting around watching a football game.

Ingredients:
1 batch of my Perfect Pizza Dough recipe (use 1/2 a batch if you want to make thin crust)
Pepperoni
Italian Sausage (about a 1/4 lbs)
1 Green Pepper
1/2 Onion
2 cups Mozzarella
Feta Cheese
Pizza Sauce
Italian Seasoning
Garlic Powder

Directions:
  1. Preheat the oven to 450°
  2. Dice your Green Pepper and Onion
  3. Work the dough onto greased pizza pan
  4. Using a fork, poke holes all over in the dough
  5. Once the oven is preheated, put the dough in the oven for 5 minutes
  6. Remove from the oven and spread about 3/4 cup of pizza sauce over the dough
  7. Add the mozzarella
  8. Add your Green Pepper and Onion
  9. Add little chunks of the Italian Sausage (this is uncooked sausage, this will cook completely and is food safe)
  10. Add the pepperoni
  11. Add the feta cheese (about 1/4 cup)
  12. Sprinkle with Garlic Powder and Italian Seasoning
  13. Put in the oven for 10 minutes til the crust browns some and the cheese is melted.
  14. Enjoy!

0 comments

Pizzeria Cheese Sticks

Everyone loves cheese sticks! I worked a local pizza shop in College and learned the tricks to make irresistible cheese sticks that the whole family will love.


Ingredients:
Half a batch of my Perfect Pizza Dough recipe
Mozzarella cheese (use a block of whole milk mozzarella and cut off slices with a knife about 10 slices, or use about a cup of shredded mozzarella.)
2 tablespoons of melted butter
Garlic Powder
Italian Seasoning

Directions:
  1. Stretch out the dough on a greased pizza pan.
  2. Brush melted butter over the uncooked dough.
  3. Spread cheese over the dough.
  4. Sprinkle with garlic powder and italian seasoning.
  5. Bake at 450° for about 6 minutes, just until the cheese is melted but before the dough gets brown.
  6. Cut into slices and enjoy by dipping into some pizza sauce!
  7. Enjoy!
0 comments

Perfect Pizza Dough


Pizza dough is easy to make and it is exponentially better than anything premade. Follow these simple steps and you'll have perfect dough every time.

Ingredients:
3 cups flour (bread flour if you have it)
1 tablespoon sugar
1 teaspoon salt
3 tablespoons oil (canola works best, don't use olive oil)
2 tablespoons honey
1 packet dry active yeast (or 2 1/4 teaspoons)
1 cup warm water

Directions:
  1. In a kitchen aid (or in a bowl using a wooden spoon to mix) combine flour, sugar, salt, oil, honey, and yeast. Add the water and mix til combined. The dough should be slightly sticky but not so much that you can't get it off the bowl or your fingers. Add more flour if necessary.
  2. Knead the dough for a few minutes.
  3. Put dough back in the mixing bowl and cover.
  4. Let rise for an hour (or more!)
  5. Work dough with hands in a circular motion to stretch it out to the size of your pizza pan. If you're brave, try the pizza toss! The spinning motion stretches the dough out to size while maintaining a perfect circle.
  6. Enjoy!
0 comments

Grilled BBQ Hawaiin Pork Chops

Don't let the "messy" or the "sticky" fool you. These are worth every juicy bite!


Ingredients:
6 to 10 half inch cut Smithfield Bone In Pork Chops (Smithfield because they are the best.)
1 Quart of your favorite BBQ Sauce (I reccomend Stubs bold and spicy, Thanks Ben!
1 Can of Dole Sliced Pineapple Rings
1 Red Apple
1 Sweet Yellow Onion
1/2 Cup Salt
1/2 Cup Sugar
1 Tsp Granulated Garlic
1 Tsp Black Pepper
1 Bay Leaf
Cold Water


Directions:

  1. Place Boneless Pork Chops in a bowl or dish deep enough to have at least 1/2 of water over the tops of the chops.
  2. Slice both the apple and onion with skin on uinto quarters and add to bowl.
  3. Add Salt, Sugar, Granulated Garlic, Black Pepper, and Bayleaf evenly over the bowl.
  4. Poor enough water over the chops, and seasoning to cover the stack by a half inch
  5. Using your clean hand or a spoon mix together the mixture and chops. You just made a brine
  6. Cover bowl with plastic wrap thoroughly almost as air tight as you can get it
  7. Place the brine in teh refrigerator a minimum of 6 hours. (I let my sit over night)
  8. When your ready to cook take the chops out and drain on paper towels for about 1 min.
  9. Prep BBQ Sauce and Pinapples for grilling
  10. With Grill on High or 'HOT" Grill Pork Chops without Sauce for 1 minute on each side
  11. Slather Chops with BBQ Sauce and Flip cook for 1 minute.
  12. Flip Chops and Repeat step 11 a 5 times.
  13. Place Pineapple Rings on Grill to get a little char for 45 secs.
  14. Remove Chops to tray and Place freshly grilled pineapple rings on top.

I like to serve these with rice and grilled corn, DELICIOUS!

ENJOY!

1 comments

Hurricane Hamburgers

So we lost power with hurricane Irene and still don't have it back on yet. I must say, my wife and I miss cooking. Something about having hot, delicious food is the essence of good living. Wise words in Ecclesiastes 2:24 sum this point up well, "There is nothing better for a person than that he should eat and drink and find enjoyment in his toil. This also, I saw, is from the hand of God"

Our generator powered fridge contained some ground beef. So, naturally, we decided to grill.

My approach with something like burgers is 'simple is best'. I've seen tons of recipes where you put lots of things in the beef and it basically becomes a meatloaf burger. I think the best burger is one where you keep it simple and let the beef shine.

Ingredients:
1 lbs of ground beef (80/20, get the best quality you can, like angus)
2 tablespoon of butter
salt
pepper

Directions:
  1. Form your patties. I like to use 1/4 lbs per burger, but you could make them smaller or even do sliders if you prefer. To form the patties, I like to put the meat in a bowl and then put another bowl on top. Press down and it should form a very nice, uniform patty.
  2. Melt you butter.
  3. Brush butter on the tops of the formed patties.
  4. Add salt and pepper to your burgers. Or you can add a good quality seasoned salt. My preference is to not add a bunch of 'grill' seasonings. Again, let the burger be a burger. I want my burger to taste like good beef not some pre-mixed seasoning. Salt and pepper will do the trick.
  5. Grill burgers for 5-7 minutes on each side depending on your grill and how done you want them (160 °F is food safe temperature for beef). Don't open the grill except when you turn the burgers. Don't press down or smash the patties, and don't turn them more than once! When you do turn the burgers, feel free to splash on a generous amount of melted butter again!
  6. Take burger off grill, put on a bun with your favorite toppings and enjoy!

Remember, just because you don't have power doesn't mean you can't eat great! I'm thinking tonight I'll get out the smoker and do some salmon!


Tuesday, August 23, 2011 0 comments

Mexican Corn Jalapeno Taco Quesadilla


This is an easy to make and deliciously quick appetizer.

Ingerdients:
1 10 inch Flour Tortilla
1/2 Cup Shredded Mild or Sharp Cheddar Cheese (Jack or Fresco Cheese is also good)
1/2 Cup Browned Ground Beef (I prefer to season thsi beef with a Taco Seasoning Packet)
18 to 20 Slices of Jalapeno Pepper (For this recipe I prefer Mt. Olive Brand Jar Slices)
1/4 Cup Corn Kernels
1/2 Cup Tomato based Salsa of choice
1 tsp Butter or Margerine
1/4 Cup Sour Cream
1/8 tsp Paprika (I prefer Smoked Paprika for a kick)
1/8 tsp Cumin
1/8 tsp Granulated Garlic
Salt and Pepper

Fun Tip!: "Think of the preparation steps as if you were building a pizza!"

Directions:
  1. Spread butter evenly on 1 side of tortilla
  2. Place large skillet on Medium High and allow to preheat for 45 secs
  3. Place tortilla buttered side down on skillet
  4. Sprinkle evenly your Cheese or Cheeses over the tortilla.
  5. As the cheese begins to melt add Seasoned Ground Beef evenly over the tortilla
  6. Sprinkle Corn Kernels evenly over the tortilla
  7. Place Sliced Jalapenos like evenly over the tortilla
  8. Using a tablespoon sprinkle and slather 1/4 cup of your Toamto Salsa over the tortilla
  9. Pinch or Sprinkle Paprika, Cumin and Garlic over the tortilla
  10. Salt and Pepper to taste
  11. As tortilla turns a golden brown using your spatula fold the torilla in half
  12. Flip the Quesadilla as needed till you see that the cheese is now soft and melted
  13. When grilled to liking place Quesadilla on cutting board and slice into 6 even pieces
  14. Place 6 slices on pplate and garnish with Paprika Spinkles and Jalapeno
  15. Add small cups of Sour Cream and Salsa and serve warm

ENJOY!
0 comments

Simple Classic Margarita

Looking for a simple classic margarita that you can easily make at home? This is the drink for you. Homemade margarita's are great and they have way less calories than if made from a mix. The homemade ones don't have the syrupy taste you get from mixes. Once you try this classic margarita you won't go back to mixes!


Ingredients:
2 oz Tequila
3 tablespoons Triple Sec
2 tablespoons fresh squeezed lime juice/or 1 lime
This makes one drink.

Directions:
  1. If you have a mixer, you know what to do! If you don't have a mixer fill a tall glass with ice.
  2. Juice your lime and add it to the iced cup.
  3. Add your triple sec and tequila. Again, if you don't have a drink mixer take another class of the same size and put them opening to opening.
  4. Shake well for 10-15 seconds (this lets some ice crystals form).
  5. Pour into a margarita glass full of ice.

For extra flavor take a lime and wet the edge of the glass, then coat with salt by pouring some salt onto a plate and rubbing the wetted glass edge on the salted plate. You can always adjust this recipe to taste. The key is the ratio of lime juice to triple sec.

Monday, August 22, 2011 1 comments

Best Ever Homemade Buns


Want an artisan quality bun for your gourmet burger, sandwich, or bbq? Try this easy fail-proof recipe out:

Ingredients:
1 1/2 cups warm milk (use whole milk if you have it!)
1 teaspoon yeast
1/2 teaspoon salt
2 tablespoons sugar
1 egg
1/3 cup oil (canola works fine)
4 cups flour (bread flour is preferred, the higher gluten content of bread flour means it will be more like store-bought bread.)

Directions:
  1. In a large mixing bowl, combine milk, yeast, salt, sugar, egg, and oil. Let sit five minutes.
  2. Add one cup of flour at a time until dough becomes more ball like but still sticky.
  3. Add a little more flour and begin kneading.
  4. Continue adding flour and kneading until the dough is smooth and elastic.
  5. Let dough rise in a greased, covered bowl until doubled, about an hour.
  6. Shape into hamburger or hot dog buns. The dough should make about 8-10 buns, but it's up to you how big you want them. Brush egg white over the tops if you want to add sesame seeds, minced garlic, or sauteed minced onions.
  7. Let rise again about 30 minutes.
  8. Bake for 20 minutes at 350 degrees.
  9. Let cool completely then cut in half.

These buns are WOW! Great texture, just like the store, but with the freshness you can only get with homemade bread. You can also freeze these. I'd cut them in half before you freeze them to make for easier enjoyment. Simply pull them out of the freezer a few hours before you want to eat them and they'll be nice and fresh tasting.

P.S. the picture above has my North Carolina style smoked pork. I'll do a post on that soon!
0 comments

Best Sandwich Bread At Home


It's a well known fact. Homemade bread mostly is bad. It's crubly, dry, and is missing the great texture we all love from store bought bread.

Well if you are like me and don't like most homemade bread, this recipe is for you. This healthy (yes, it really is) bread has the light fluffy texture of store bought bread with all the freshness you love of homemade bread. Once you try it you will never buy bread again for sandwich.

Ingredients

3 cups warm water
2 (.25 ounce) packages active dry yeast or 4 1/2 teaspoons of yeast
1/3 cup honey
5 cups bread flour
3 tablespoons butter, melted
1/3 cup honey
1 tablespoon salt
3 1/2 cups whole wheat flour
2 tablespoons butter, melted

Directions
  1. In a large bowl, mix warm water, yeast, and 1/3 cup honey.
  2. Add 5 cups white bread flour, and stir to combine.
  3. Let set for 30 minutes, or until big and bubbly. Be careful though, this can bubble over your bowl.
  4. Mix in 3 tablespoons melted butter, 1/3 cup honey, and salt.
  5. Stir in 2-3 cups whole wheat flour.
  6. Flour a flat surface and knead with whole wheat flour until not real sticky - just pulling away from the counter, but still sticky to touch. Place in a greased bowl, turning once to coat the surface of the dough. Cover with a dishtowel.
  7. Let rise in a warm place until doubled, about an hour.
  8. Punch down, and divide into 2-3 loaves.
  9. Place in greased 9 x 5 inch loaf pans, and allow to rise until dough has topped the pans by one inch. If you want taller bread, just do two loaves, if you're ok with bread that isn't as tall as store bought bread go with 3 loaves. Make sure when you divide it up you don't stretch it out longer than your pan. You want the dough to rise to the size of the pan, if it's already longer or wider you'll get un-pretty bread, it'll still taste good though.
  10. Bake at 350 degrees F for about 25 minutes; do not overbake.
  11. Lightly brush the tops of loaves with 2 tablespoons melted butter or margarine when done to prevent crust from getting hard. Cool completely.

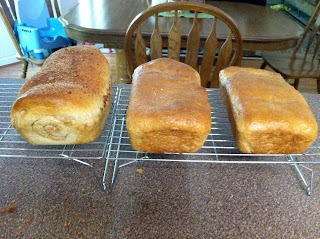
Now if you are craving something sweeter follow the steps above except after it has risen roll it out. Again, make sure you don't make it longer than the width of your pan, but roll it out long. Then brush the dough with about 2 tablespoons of melted butter. Then make a simple cinnamon mixture of about 1 tablespoon white sugar, 1 tablespoon brown sugar, 1 teaspoon cinnamon. Just make it taste good to you. Sprinkle that over the dough covered with butter. Roll up the dough and place in the pan to finish rising. A great treat!


I should also say that you can freeze this bread. Since homemade bread will only stay fresh for about 5 days it's a good idea to freeze your extra loafs. Simply pull it out of the freezer and let it thaw overnight to eat the next day.


;